Sunday 1 September 2013

Potato Ojja

Potato Ojja is my most favourite meal after a roast beef dinner. It's delicious, cheap and fast.
This generously serves two hungry people. 
2 baking potatoes, diced small
2 tomatoes, diced small
4 fat cloves of garlic, finely chopped.
Olive oil
2tsp Cayenne pepper or medium chilli powder
1tsp Ground Coriander 
2 fat green chillies, roughly diced.

Pop some oil in a sauce pan and get nice and got, put diced potatoe into pile and mix, let the potato fry until it changes colour and softens. Add diced tomato and garlic and mix well. Add spices and mix again and a dash of water to loosen. Allow to cook down and thicken. Once everything has melded together add chopped chillies and let cook for 5 minutes. Serve with lots of bread and sprinkle with chopped fresh parsley. 

Yum!! 

Tuesday 30 April 2013

Swiss meringue buttercream

Now I'll be honest until fairly recently I used to eat my cupcakes unadorned. Maybe a smear of tooth achingly sweet buttercream as a nod to the sugar fairies. Tradition English buttercream has its place but Oh my Goodness it can really overwhelm a little cupcake, if loaded up with sugary whipped butter. Buttercream has its place in my life but not (for me anyway) on top of my beautiful light, moist bites of heavenly sponge.
I didn't know I was looking for an alternative, until I stumbled across Italian Meringue Buttercream, which I've already written about on my blog. This was the answer I was looking for! Silky, light almost like sweet whipped air. Now I still love IMBC, but I'm now a complete convert to SMBC, and with lots of recipes online you can't fail. But they all seem really labour intensive? Worry no more. In my quest for deliciousness I came across the basic recipes by Fair Cake and The Gourmet Cupcake Company and adapted them slightly to suit my preferences. All you need is an electric hand whisk or stand mixer such as a Kitchenaid which do all the work for you.

Equipment:
Stand mixer with whisk attachment or electric hand whisk.
Large, clean grease free heatproof bowl.
Small to medium saucepan of water
Balloon whisk
Spatula
Sugar thermometer if you have one. If not font panic.

This will make enough frosting for 24 cupcakes or 1 x 8" cake.

Ingredients
250gms butter (I prefer to use salted)
120gms Golden caster sugar - you can use white caster if preferred
1tsp vanilla extract
2 Large Egg whites. Freeze the yolks for another day. I hate waste.

The nitty gritty:
Place caster sugar to egg whites into your a bowl. Your making this icing over a method called a Bain Marie or double boiler. Place your saucepan on the stove and pop the bowl on top so it perches nicely on the pan but with the base of the bowl not touching the water.
Now with your electric hand or balloon whisk beat the eggs and sugar over the hot water until it turns from opaque to thick and white. Do this until the sugar dissolves in the egg whites. Test this by pinching the meringue between your thumb and finger. You should not be able to feel any granules from the sugar. If you have a sugar thermometer pop it in and the meringue should reach 60C or 140F when its ready. This process doesn't take too long so do give it a go.

Take the bowl off the saucepan and scrape the meringue mix into your stand mixer bowl if using or pop the bowl onto a folded tea towel on your work surface to stabilise it. Beat for 10 minutes on high speed. Feel the bottom of the bowl to check the temperature from time to time. When it's cool to the touch its ready. By then you should have fluffy clouds of meringue in your bowl.

You can stop here and pip this onto Lemon Cupcakes filled with homemade lemons curd and then using a gas gun quickly blast the swirl of meringue you've piped into it and you have a luscious lemon meringue cupcake.

Or you can take it one step further to heaven and add the butter. Chop all 250g into rough cubes. Approximately 16 pieces. Make sure the bowl is cool to the touch or the butter will melt as you start adding it to the meringue. Start
to add one cube of butter at a time. Wait until the butter has been mixed thoroughly before adding another cube. After half the butter has been added the mixture may lose it volume and look curdled. Fear not this just means its going to taste wonderful. Continuing adding the rest of the butter as above. Once its all added approx 5 minutes leave to beat on high for a further 10mins. Yes it's taken a long time but believe me when I say it's 30 minutes you'll happily spend each time you make it once you've tasted what you've made.
Little hint if the bowls really not cool enough before you add the butter feel free to let the mixer beat it until it is. If the mixture still looks curdled its because the butter has melted into the too warm mixtures. But pop it in the fridge for 20 minutes and then beat it again and it should all come together nicely.

Flavour this however you want with Vanilla or some fabulous Foodie Flavours. If you want to colour it please don't use liquid food colouring as it will just make the buttercream running and yucky. Use Sugarflair or Wilton food colouring pastes and gels. Fab, vibrant colours and easily available. Especially online with Amazon or eBay.

Variations to try are

Marshmallow ideal for whoppie pie fillings 4tbs of marshmallow fluff beaten in to your SMBC.

Peanut butter just add a large tablespoon of smooth peanuts butter in and the top a vanilla cupcake filled with seedless raspberry jam.

For Oreo Cream I'd add 4tbs of fluff and half a packet of crushed Oreo cookies folded through at the end and top a nice chocolate cupcake.

Possibilities are endless and you really must try this SMBC adorned on a vanilla cupcake! It's heaven in a mouthful!

www.faircake.co.uk
www.foodieflavours.com
www.gourmetcupcakes.co.uk
My Facebook cake blog is Heather's Cake Crumbs so come and say Hello!!

Sunday 28 April 2013

Rainbows and Butterflies

Rainbows and butterflies! There is nothing sweeter than a beautifully iced and decorated celebration cake and to cut the first slice to reveal the most stunning, vibrant colours inside as well as out.

Ingredients
275g Caster sugar
275g Soft butter
275g Self raising flour
3 Large eggs
1tbs sour cream
1tsp Vanilla extract
1tsp Baking powder
Food colouring gels/paste NOT liquid food colouring.

Cream butter and sugar together and add each egg one at a time beating well at each addition and add the vanilla extract and sour cream. Then add the sifted flour and baking powder and give it a final mix. Don't over beat it! But make sure it's lovely pale and fluffy. Divide batter into 6 bowls and colour in your chosen colours. Remembering to go slightly darker as the cake changes depth of colour once baked.

Now this is where you can play with how the cake works. You can use cupcake cases. This mix should yield approx 18 to 24 standard cupcakes. Or two 7" sandwich tins one 8" deep cake tin.

I'm using the 8" in this one. Line one 8" deep cake tin and select your first colour. Pour batter into the middle of the tin. Then select the next contrasting colour and repeat, pouring each colour into the centre of the previous colour and repeat until all batter has been used. This looks great in graduated shades of the same colour going darker to lighter.

Bake cake in a preheated oven at 160 for 1hr 15mins. Test my putting a skewer in the middle of the cake and if it comes out clean its ready.

Method for cupcakes.
Place a small amount of each coloured cake batter in the case until 3/4 full. Bake for 18 minutes.

7" sandwich tins use 5 colours of cake batter. Grease and line the two tins and place a 5th of batter into each one and spread out evenly. Bake them for 20 mins on 160 until the cakes coming away from the sides of the tin and cooked through with a skewer. Repeat until each colour has been baked and allow to cool and then sandwich the layers with buttercream. And voila!

Another cute method is to do spoonfuls of batter in alternating colours in the large 8" tin and bake as above.


Saturday 27 April 2013

BF Stackers

Ingredients:

8 egg whites
450g Golden Caster Sugar
2 tablespoons cocoa powder
1 teaspoon vanilla extract
1 teaspoon white wine vinegar

400ml whipping or double cream
Jar of morello cherries or a tin of black cherry pie filling
Two tablespoons of Amaretto, cherry brandy or kirsch.
100g toasted flaked almonds
Dark chocolate shaved into curls 

Preheat oven to 220ยบ C. Place a sheet of baking paper on two large baking tray and draw 3 circles roughly 7inches.

Beat your egg whites until they are stiff and add your sugar slowly one tablespoon at a time and beat until stiff peaks form.

Sift the cocoa powder into the meringue and fold through carefully with the vanilla extract and vinegar. The vinegar makes the meringue chewy.

5. Shape the meringue onto the three circles on the baking parchment placed on the baking trays. Smear a little meringue on the corner of each piece of parchment to stick it to the tray. Place meringues into oven and immediately turn temperature down to 120 degrees. Bake for 90 minutes then turn off oven, do not remove meringues until oven is cool.

Drain the cherries into a colander with a bowl underneath it to catch the syrup. Give the cherries a shake to make sure the syrup drains out of them. You will want the cherries quite dry so give them a bit of time to drain.

Pour the cherry syrup and one tablespoon of the booze into a saucepan and over medium heat reduce it down to a honey-like consistency (about 5-10 minutes). If you over-reduce you can add a little bit of water and whisk through to make it more liquid again. Set aside. You don't need to do this if using the cherry pie filling.

Beat the cream until stiff peaks form. With a silicone spatula spread half of the cream over the bottom meringue, place cherries on the cream along with half of the flaked almonds. Sprinkle half of the chocolate shavings over the meringue.

Repeat with the second and third layers. Spread the remaining cream over it along with the cherries, nuts and chocolate shavings. Top with the chocolate curls and a fine dusting of cocoa powder. Dribble the reduced cherry syrup over the entire pavlova or the sauce from the pie filling let down with some of the booze.

Friday 26 April 2013

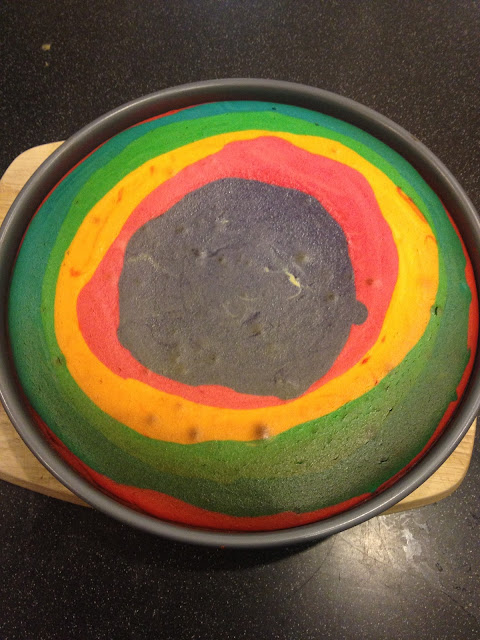
Rainbow Cheesecake

I just had to make this as soon as I saw a post on Facebook of a rainbow baked cheesecake! So I dug out my favourite calorific recipe by Jamie Oliver for his New York Cheesecake; Nipped to the supermarket and loaded my basket with 900g of cream cheese! YES 900g!!! and got straight into the kitchen!

The recipe doesn't really matter as long as its a standard 23cm baked cheesecake recipe.

Ingredients
250g digestive biscuits, crushed or any biscuit of your choice I like a ginger nut, Hobnob, Oreo cookie or chocolate digestive for a change. Whatever you fancy really.

150g Butter melted
115g Caster Sugar
3tbs Cornflour
900g of Full Fat Cream Cheese
2 Large Eggs
115ml Double Cream
1/2tsp Vanilla Extract

Food colouring paste NOT liquid food colour!!
Red
Blue
Green
Yellow
Pink
Purple.
Or any colours of your choice. It would be nice to split the mix into two colours and dye half the mix one colour and leave the other plain and have a pretty striped cake or make half chocolate and that will give you a zebra effect.

Mix crushed biscuits and butter and press into your 23cm springform cake tin. Bake at 200 in a hot oven or ten minutes and then leave to cool slightly.

Turn oven down to 180.

Beat the cream cheese and sugar until fluffy with a hand mixer and then add the eggs and beat again, and then slowly add the double cream and vanilla until thoroughly mixed and fluffy.

Split mixture equally as possible into six bowls. Then dye each bowl of batter a different colour.

Pour your first colour of choice onto the biscuit crumb base of the tin. I started with red. Give the pan a little shake so the batter covers the bottom evenly. Then pour your next colour into the centre. Do not shake this time but take the next colour and pour into the centre again. And repeat until all the batter is used and in concentric circles. Place on a baking tray and bake for 45minutes.

You should still have a slight wobble in the centre. Allow to cool and then refrigerate for a min of three hours or overnight.
To serve cut with a hot knife and marvel at how brilliant you are. Serve with fresh berries and creme fraiche. Delish!!

Tip to release from the tin run a table knife or pallet knife under a hot tap and dry off as then release the cake from the edges of the tin by running the knife around the sides before releasing from the springform tin.


Sunday 10 February 2013

American Pancakes

This delicious, spongey, warm stack of beautiful pancakes anointed with amber, sweet, sticky maple syrup! What can beat this as a lovely Sunday morning breakfast? I love these! I love making them for when people stay over at the weekend! I serve them with butter, maple syrup and lots of fresh berries like raspberries and blueberries! Recipes is straight from Nigella! Never fails and always impresses! Make, eat, share and enjoy!

Ingredients

225 gram(s) plain flour
1 tablespoon(s) baking powder
1 pinch of salt
1 teaspoon(s) white sugar
2 large egg(s) (beaten)
30 gram(s) butter (melted and cooled)
300 ml milk

I'm lazy so I chuck everything into my blender and whizz for a few seconds until smooth but you can easily put all the ingredients in a bowl and give it a good whisk by hand. It's really not difficult.

I always use a large 2pt measure jug for the mixture making it easier to handle. I also have two squares of kitchen paper. One for under the jug to catch any drips of batter and the second dipped in a little oil to degrease the pan in between batches of the pancakes.

Get a nice large frying pan hot and oiled. Then dollop tablespoons of mixture about three or four depending on size of pan and wait for little air bubbles to appear on the surface of the pancakes. They are ready to turn when they are drier around the edges and have a nice even coverage of air holes across the top. Turnover and cook for a few more seconds and then pop on a plate. Swipe the hot pan which your oiled paper towel and repeat until all the mixture is used up.

Utter scrumptious!!!

Tuesday 22 January 2013

Red Velvet Cupcakes

I've been bored laid up at home recovering and frustrated as I'm starting a new diet this week to shed these unwanted pounds! I've stumbled across the fabulous Brown Eyed Baker and had to make her Red Velvet Cupcakes. She's adapted the recipe from the Humming Bird Bakery and they totally hit the spot. I didn't have any buttermilk and can't get out to the shops to collect so I used natural yogurt to fantastic results! They are topped with a simple butter cream and are a beautiful colour. Simple and perfectly formed. These will definitely be going on our menu when we open up our dream Cafe/deli. Enjoy!!

Makes 12 cupcakes prep time: 15 minutes cook time: 20 minutes total time: 35 minutes.

INGREDIENTS:
4 tablespoons unsalted butter, at room temperature
¾ cup caster sugar
1 egg
2½ tablespoons cocoa powder
2 tablespoons red food coloring
½ teaspoon vanilla extract
½ cup natural yogurt / buttermilk
1 cup + 2 tablespoons self raising flour
½ teaspoon salt
½ teaspoon baking soda
1½ teaspoons distilled white vinegar

1. Preheat oven to 200c and line a cupcake pan with cases.

2. On medium-high speed, cream the butter and sugar until light and fluffy, about 3 minutes. Turn the mixer to high and add the egg. Scrape down the bowl and beat until well incorporated.

3. In a separate small bowl, mix together the cocoa powder, vanilla extract and red food coloring to make a thick paste. Add to the batter and mix on medium speed until completely combined. You may need to stop the mixer to scrape the bottom of the bowl, making sure that all the batter gets colour.

4. Reduce the mixer speed to low and slowly add half of the buttermilk or yogurt (if using). Add half of the flour and mix until combined. Scrape the bowl and repeat the process with the remaining yogurt and flour. Beat on high until smooth.

5. Again, reduce the mixer speed to low and add the salt, baking soda and vinegar. Turn to high and beat for another couple of minutes until completely combined and smooth.

6. Divide the batter evenly between the cupcake liners and bake for about 20 minutes, or until a thin knife or skewer inserted into the center of the largest cupcake comes out clean.

7. Cool for 10 minutes and then remove cupcakes from the pan and place them on a cooling rack to cool completely before frosting.

*Note: This recipe can be doubled to make an 8 or 9-inch layer cake.

Credits: (Recipe adapted from Joy the Baker, originally from The Hummingbird Bakery Cookbook)


Saturday 19 January 2013

Chubby Hubby truffles

Oh my god!!! You have got to make these! I found them on my favourite website the Brown Eyed Baker and this has got to be the best recipe I have ever made! The fact I'm going on a massive weight loss diet means I can't make these for myself but I have friends over in a few weeks and I'll be making these for them! I cannot WAIT!!!

INGREDIENTS:
1½ cups pretzel pieces
½ cup smooth peanut butter
1 tablespoon unsalted butter, at room temperature
2 tablespoons light brown sugar
Pinch salt
3 tablespoons powdered sugar
1 cup milk chocolate broken up and melted.

DIRECTIONS:
1. Put the pretzel pieces into a resealable plastic bag and crush into very small bits (a rolling pin works great for this).

2. In a small bowl, combine the peanut butter, butter, brown sugar and salt. Stir until all of the ingredients are completely blended and smooth. Add the pretzel bits to the peanut butter mixture and mix thoroughly. Add the powdered sugar and mix until completely combined.

3. Line a small baking sheet with wax paper. Using a small cookie scoop, or about 2 teaspoons worth of peanut butter mixture, gently shape into a ball with your fingertips. Place the ball on the wax paper-lined cookie sheet and repeat with the remaining peanut butter mixture. Place the baking sheet into the refrigerator and chill for at least 30 minutes.

4. When ready to dip the truffles, microwave the chocolate in a small bowl at 50% power in 30-second increments, stirring after each, until completely melted and smooth.

5. Working one at a time, dip one peanut butter-pretzel ball into the melted chocolate and use a fork to roll it around, ensuring that it is completely coated with chocolate. Let any extra chocolate drip off and place back on the wax paper-lined sheet. Repeat with all of the peanut butter-pretzel balls.

6. Return the baking sheet to the refrigerator and again chill for at least 30 minutes. Garnish with a drizzle of melted peanut butter and crushed pretzels, if desired. Store in an airtight container in the refrigerator.

Friday 18 January 2013

Red Pepper Soup

Another gem from Sandra to grace the pages of my lonely blog. This is healthy and delicious and as always super fast!

Three red peppers deseeded and chopped into 6
Six tomatoes quartered
One red onion peeled and quartered
1tbsp Garlic oil
Water
Vegetable stock cube

Place all veg in a roasting tin and toss in the garlic oil and pop into a hot oven at 200c and roast for 30 mins.

Once roasted pop into a saucepan and cover with water and add the stock cube. Bring to boil and blitz with a hand blender.

Eat it whilst its yummy and hot! Really delish and another winner from the kitchen of the beautiful and talented Mrs F! Love you xxx

Tuesday 1 January 2013

Dilly Campbell's infamous Tex-Mex Dip

I've mentioned my obsession with this divine dip before and Dilly and I met up just before Christmas and she was as always fabulous enough to have written it down for me again! I've now carved this recipe in every place possible so I never lose it again! I can't wait to make this for movie night and munch through a large bag of tortillas.

Ingredients
2 avocados
2tbsp lemon juice
Salt & Pepper
Chop the avocados and mix in a bowl with the lemon juice. Set to one side

1 cup sour cream
1/2 cup mayonnaise
1 packet of Fajita seasoning
Mix all together in a separate bowl and set to one side.

1 tin refried beans
1 jar Hot Tomato salsa
1/2 bunch of spring onions chopped finely.
3 fresh tomatoes diced small
1 jar black sliced pitted olives, drained
100g grated cheddar

Layer all the above ingredients in an ovenproof dish as below:

1. Refried beans
2. Avocados
3. Sour cream, Mayo mix
4. Fresh tomatoes
5. Spring onions
6. Salsa
7. Black sliced olives
8. Cheese

Pop in the oven and back until the cheese is crusty and melted. Serve with Nachos, Tortilla chips or Tacos.